# Introduction
Medicare is a comprehensive, full-stack Clinic Management System (CMS) designed to revolutionize healthcare practices by streamlining clinic operations and improving patient care. With Medicare, healthcare providers can efficiently manage patient appointments, doctors' schedules, and overall clinic administration.
This user-friendly system facilitates seamless interactions between clinic staff, doctors, and patients, ensuring the smooth handling of medical records, consultations, and appointment bookings. Whether for a single-doctor clinic or a multi-specialty hospital, Medicare adapts to the unique needs of any healthcare facility.
Medicare supports both local and international healthcare operations, offering flexibility in managing appointments and patient data across multiple locations. Its dual capability of handling in-house clinic management and online appointment scheduling empowers healthcare providers to connect with patients remotely, enhancing accessibility and convenience.
-
What Included With Medicare?
- Admin Panel
- Website
- Patient App
- Doctor App
- Laravel ApI
-
Key Features of Medicare
-
Comprehensive Platform
- Includes an Admin Panel, User App, Website, and Doctor App for seamless clinic operations.
-
Appointment Management System
- Easy booking of appointments with both in-person and video consultation options.
- Features appointment check-in and token number generation for smooth patient flow.
-
Advanced Clinic Management
- Manage departments and specializations to organize medical services efficiently.
- Comprehensive management of patients, their medical records, and prescriptions.
- Doctors can maintain detailed profiles with expertise and availability.
-
Time Slot Management
- A robust and flexible scheduling system for doctors, ensuring optimal time utilization and minimized overlaps.
-
Billing and Financial Control
- Invoice generation for patients to streamline payments.
- Manage discount coupons and promotional offers.
-
Role and Permission Management
- Set up and manage user roles and permissions for streamlined access and operations.
-
Testimonial and Review Management
- Collect and display testimonials from patients to enhance the clinic’s credibility.
-
Customizable Configurations
- Full control over mobile app and web panel settings, ensuring adaptability to specific clinic needs.
-
Video Call Integration
- Secure and efficient video calling for remote consultations between doctors and patients.
-
Multi-Platform Accessibility
- Users can access services from the mobile app, web interface, or through direct interaction with the clinic.
-
Technology Stack Used to Build Medicare
- Frontend: React.js for building responsive and user-friendly interfaces for the website and admin panel. Flutter for user apps (Android and iOS) and doctor apps (Android and iOS).
- Backend: PHP Laravel for handling server-side logic and API management.
- Database: MySQL for storing patient data, appointments, and medical records securely.
- Authentication: Firebase Authentication for secure user authentication.
- Video Call Integration: Zoom for seamless and secure video consultations between doctors and patients.
- Payment Gateway: Razorpay and Stripe for processing payments efficiently and securely.
Getting Started
To get started, First complete the installation process for the Medicare software. Once the installation is finished, you can log into the Admin Panel, Web App, and Mobile Application. Let's begin with accessing the Admin Panel and setting up all the required sections to ensure your system is fully configured and ready for use.
- Admin Login
- Configuration Settings
To log into the Admin Panel, open the hosted Admin Panel URL in your browser. You will be directed to the login page. Enter the same email address and password that you used during the API installation process to access the Admin Panel.
Once you're logged in, you'll need to configure some settings. Start by navigating to the "Settings" section from the drawer menu. Then, go to the "Basic" tab, where you can update the logo, favicon, email, phone number, and other relevant information. After that, head to the "Web" tab under Settings and update the doctor’s image.
Remember, the video and Firebase configuration are essential, and these were set up during the installation process. you can update the remaining settings later to suit your business needs.
Now that we've successfully configured the startup settings, it's time to set up the initial functionalities. This includes adding departments, specializations, doctors, and other essential components to ensure your system is fully functional and tailored to your needs. Follow the next steps to configure these core sections and get your Medicare software up and running.
Initial Functionalities Setup
Before starting the appointment process, we first need to add the doctors to the system. To do this, we must begin by setting up the departments and specializations. Once these are configured, we can proceed with adding the doctors to the system, linking them to their respective departments and specializations.
- Add/Update Department
- Add/Update specializations
- Add/Update Doctor
To add a department, go to the "Department" page and click on "Add New." Fill in the department title (e.g., Cardiology, Gynecology, etc.), provide a description, and upload an image. Once you've completed the details, click "Add Department" to save the information.
Once a department is added, you can edit or delete it later. However, if the department is mapped with any doctors or appointments, it cannot be deleted directly. To delete the department, you must first unmap it from all doctors and appointments. Alternatively, if the department is no longer needed, you can deactivate it instead of deleting it.
To add a specializations, go to the "Specialization" page and click on "Add New." Fill in the title (e.g., MBBS, MD, etc.). Once you've completed the details, click "Add Specialization" to save the information.
Once a specializations is added, you can edit or delete it later.
Once you have added the department and specialization, you can proceed to add doctors. Go to the "Doctors" page and click the "Add New" button. Fill in the doctor's name, email, password, and select the appropriate department and specialization. Complete all other required details and then save to add the doctor to the system.
Once you have added a doctor, navigate to the "Update Doctor" page. Here, you can update the doctor's fee details, work experience, social accounts, address and other required fields. After making the necessary changes, press the "Update" button to save the updated information.
You can edit and delete a doctor later. However, if any appointments have been booked with the doctor, the doctor will be mapped to those appointments, and you won't be able to delete them until you unmap the doctor from the appointments. Alternatively, you can deactivate the doctor if they are no longer needed.
You have successfully completed the initial functionality setup. Now, let's move on to setting up the core functionalities to fully configure your system and get it ready for use.
Core Functionalities
Managing appointments is one of the core functionalities of Medicare. Once the doctors are set up, both the admin and patients can generate appointments. Appointments can be managed by the admin, front desk, and doctor, ensuring a smooth workflow across all parties involved.
- Generate Appointment
- Appointment From Admin Panel
- Go to the Appointments section in the Admin Panel.
- Click on Add New.
- Add a new patient or select an existing patient from the list.
- Fill in the appointment details, including selecting the doctor, appointment type, and appointment date and time and other information.
- Click Add Appointment.
- You can find the added appointment in appointment section.
- Appointment From User App
- Click on the doctors or Go to the Department Page or the Search Page.
- Click on Book Now.
- Select the appointment type and choose the date and time for the appointment.
- Select an patient or click Add New Patient to enter a new patient's details.
- Choose the payment option and confirm the booking.
- Appointment From web App
- Click on the Get Appointment button.
- Select the doctor for the appointment.
- Choose the date and time for the appointment.
- Select an existing patient or add a new patient.
- Choose the payment option (if applicable).
- Click Confirm Booking to finalize the appointment.
- Manage Appointment
- Update Patient Details
- Update Doctor
- Update Appointment Status
- Confirmed - Initially, all appointments are generated with the "Confirmed" status. This status can be changed later based on further actions or updates.
- Pending - This status indicates that the appointment is not yet confirmed. It can either be rejected or rescheduled based on further actions.
- Visited - This status indicates that the doctor has checked the patient and the appointment has been completed successfully. Note that once an appointment is updated to "Visited," it cannot be reverted or changed to another status.
- Completed - This status indicates that the appointment was a video consultation and has been successfully completed by the doctor. Note that once an appointment is updated to "Completed," it cannot be reverted or changed to another status.
- Rescheduled - This status is used when the appointment date or time is changed. The rescheduling operation can only be performed through the Admin Panel.
- Rejected - This status indicates that the appointment has been rejected. This action is taken through the Admin.
- Cancelled - This status indicates that the appointment has been canceled by the user. The cancellation process begins when the user submits a cancellation request from the User App (Edit Appointment page). The admin can then view the request in the "Edit Appointment" page or the "Cancellation Requests" page. If the admin approves the request, the appointment status is updated to "Cancelled."
- Add/Update/Print Prescriptions
- Patient File
- Appointment Checkins
- Appointment Cancellation
- Appointment Calender
- Appointment Payment
- Join Video Call
- Transaction
- All Transactions: Displays transaction IDs and detailed records of all transactions.
- Invoice: Contains the invoice details associated with each transaction.
- Payment: Shows the attached transaction ID along with the invoice ID and other relevant details.
Appointments can be generated from the Admin Panel, Web App, and Mobile App. Let's understand how appointments can be generated in each of these platforms.
Admin, doctors, and front desk staff can find the generated appointments in the Appointment List, Dashboard, and Appointment Calendar. From these sections, they can view and edit the appointment details as needed.
From the "Edit Appointment" page, you can update the patient's details by clicking the link button associated with the patient's information. This button will navigate you to the Patient Details page, where you can update the patient's information as needed.
You cannot update the doctor for an existing appointment. If a change is required, you must reject the current appointment and create a new one with the updated doctor details
Our system supports a total of seven appointment statuses, each representing a specific stage in the appointment process. These statuses help track and manage appointments efficiently, ensuring clear communication between admins, doctors, and patients.
The prescription can be checked from the "Edit Appointment" page or the "Prescription" page. You can add or update the prescription directly from the "Edit Appointment" page by entering the necessary details and saving the changes.
Remember, if you want to map all medicines, press the "New Medicine" button or go to the "Medicine" page to add new medicines. Once you've mapped all the medicines, there’s no need to type them multiple times; you can simply select them from the list.
Print Prescription - Once you have added the prescription, you can easily print it from the Prescription List. Simply click the "Print" button to generate a printable version of the prescription.
The patient file can be checked and added from the "Edit Appointment" page or the "Patient File" page. To add a new file, go to the "Patient File" page and press the "Add New" button. Fill out the required form and press "Add File" to save the file. You can add, update and delete reports or any other files related to the patient.
Appointment Check-in is an additional and exciting feature of Medicare. You can check in the patient and generate a queue number, which will be displayed on the clinic screen. The user can also view their queue number from the appointment details page.
Once the patient arrives at your clinic, you can check in the appointment from the Check-in page. To do so, press the "Check-in" button, where you can fill out the check-in form or scan the QR code. The QR code can be obtained from the user's phone on the Appointment Details page.
In the case of appointment cancellations or rejections, a refund will be generated only for paid appointments. This applies when the payment for the appointment was initiated by the user and successfully captured.
From this page, you can view all appointments with their scheduled times. The appointments are arranged in a calendar view, making it easy for the admin to see appointments on a daily basis. This layout helps in quickly identifying and managing appointments.
In the Appointment Details page, you can view the appointment invoice, transaction details, and payment methods. This allows you to track the payment status and manage financial transactions related to the appointment.
Before starting the video appointment, make sure you have configured Zoom in the Admin Settings page.
For video calls, we are using Zoom. In the Appointment Details page, find the meeting link field and click on the link button. This will navigate you to the Zoom link, where you can wait for the user to join the meeting.
Users can also join the meeting from the Appointment Details page (User App) by clicking the "Video Call" button.
Remember, if you reject or reschedule the appointment, the change will also be reflected in the Zoom panel. The appointment will be deleted or rescheduled accordingly in Zoom as well.
On this page, you will find three tabs: All Transactions, Payment, and Invoice. When a user completes a transaction, the record is stored in the Transaction section.
Other Functionalities
The Medicare software offers a wide range of functionalities to effectively manage the system. These include tools for patient management, user, medicines, family memeber, testimonial, doctor review, coupons, vitals, login screen and dashboard features. With features like real-time notifications, role-based access, and detailed analytics, the software ensures a streamlined and efficient workflow for clinics and healthcare providers.
- Dashboard
- Medicine
- Family Members
- Coupon
- Testimonial
- Login Screen
- Doctors Review and Rating
- Vitals
- Patient
- Users
- Roles & Permissions
The Dashboard provides a comprehensive overview of key metrics and activities within the system. Here, you can view details such as the total number of appointments, active doctors, users, and patients. Additionally, it displays user registration logs, patient registration logs, an appointment calendar, appointment graphs, and transaction graphs. This centralized view helps admins monitor the system's performance and manage operations effectively.
On this page, you can add, update, and delete medicines that will be used for prescriptions. When you create a prescription, the medicines listed here will appear as suggestions in the medicine name section, making it easier and faster to add them to the prescription.
To add a new medicine, click the Add New button, fill in the medicine name and the notes section, and then click Add.
This page displays a list of all family members added by the user. A single user can add multiple family members, which helps in making quick appointments and tracking vital details for each member.
To add a new family member, open the user app and navigate to the Family Member page. Press the Add button, fill out the form, and save the details. Alternatively, family members can also be added through the admin panel. Once added, the information can be updated or deleted as needed.
The Coupon page allows you to manage discounts (in percentages) and track the coupons used by users. You can create scheduled coupons by providing a title, value, and description. This feature helps in running promotions and managing discount campaigns effectively.
On the Testimonial page, you can add testimonials with a title, subtitle, rating, and description. This feature allows you to showcase feedback and reviews from users, helping build credibility and trust for your services.
From this page, you can add and manage the slides for the login screen of the user app. This feature allows you to customize the login experience by displaying relevant information or promotional content to users before they log in.
Once an appointment is generated, the user can provide a review and rating from the user app. These reviews and ratings can be viewed on the Review page or inside the Doctor's Details page, allowing admins to monitor patient feedback and evaluate doctors' performance.
Users can add and monitor vital statistics such as blood pressure (BP), sugar levels, SpO2, temperature, and weight for each family member. They can also view these details in a graphical format.
To add vitals, go to the Vitals page in the user app, select the type of vital, choose the family member, and enter the details with the corresponding date. Admins can also view and monitor the vitals for each user from the User Details page.
From this page, the admin can manage all the patients. To add a new patient, click the Add New button, enter the name, phone number, and other required details, and then click Add Patient. The added details can be edited later if needed.
This page displays the list of all users, including mobile app users, doctors, front desk staff, and other types of users. The admin can add, update, and edit user details.
Note that the email and phone number must be unique when adding a new user. To add a user, go to the Add User page, fill in the first name, last name, and other required fields, then click Add User.
The admin can assign different roles to different users. To do this, go to the Roles page. First, you need to create a role. Once the role is created, you can assign specific permissions to that role. After assigning permissions, you can then assign the role to the appropriate users.
Overview
To configure the Medicare system, follow these steps for each component:
-
API: Deploy the backend API on your server. Ensure it is properly set up and accessible for the other components to function seamlessly.
-
Admin Panel: Install and configure the admin panel on your web host. Use the correct base URL for seamless integration with the API and other components.
-
Web Application: Set up the web application by linking it to the deployed API and ensuring the base URL is correctly configured.
-
Mobile Application: Configure the mobile app by setting up the API endpoints and testing connectivity. Ensure the app is properly linked to the API and admin panel.
-
Doctor App: Deploy and configure the doctor application. Use the API base URL and test its functionality to ensure smooth operation for medical professionals.
Each component of Medicare can be customized to fit the specific needs of your clinic or hospital.
Customizations and changes to the system should be made with caution. We strongly recommend creating a complete backup before making any modifications. Any issues resulting from customizations will be the user's responsibility.
Prerequisites
Medicare is dependent on PHP version 8.2 or higher and MySQL version 5.7 or later. Additionally, the following server configurations and PHP extensions are necessary:
- Mod_rewrite for Apache
- BCMath PHP extension
- Ctype PHP extension
- JSON extension
- Mbstring extension
- OpenSSL extension
- PDO extension
- Tokeniser extension
- XML extension
- Zip extension
- Fileinfo extension
- Gd extension
- Sodium extension
Typically, these extensions are enabled by default on most servers. However, it is advisable to verify the configuration with your hosting provider to ensure compatibility with the project.
Api Deployment
After downloading the code from CodeCanyon, upload the medicareapi zip file in your directory and extract the zip file. API can be installed on a domain or subdomain: For Example, yourdomain.com.
You must set up the api on your sub domain. For instance, if your sub domain is subdomian.yourdomain.com, the api should be installed there to enable visitors to access the api by entering subdomian.yourdomain.com in their browser. Furthermore, appending ‘/api to the domain allows you to reach the api, effectively leading to subdomian.yourdomain.com/api.
Medicare requires an SSL certificate to be installed on your domain to work with all the services.
Let’s start the installation-
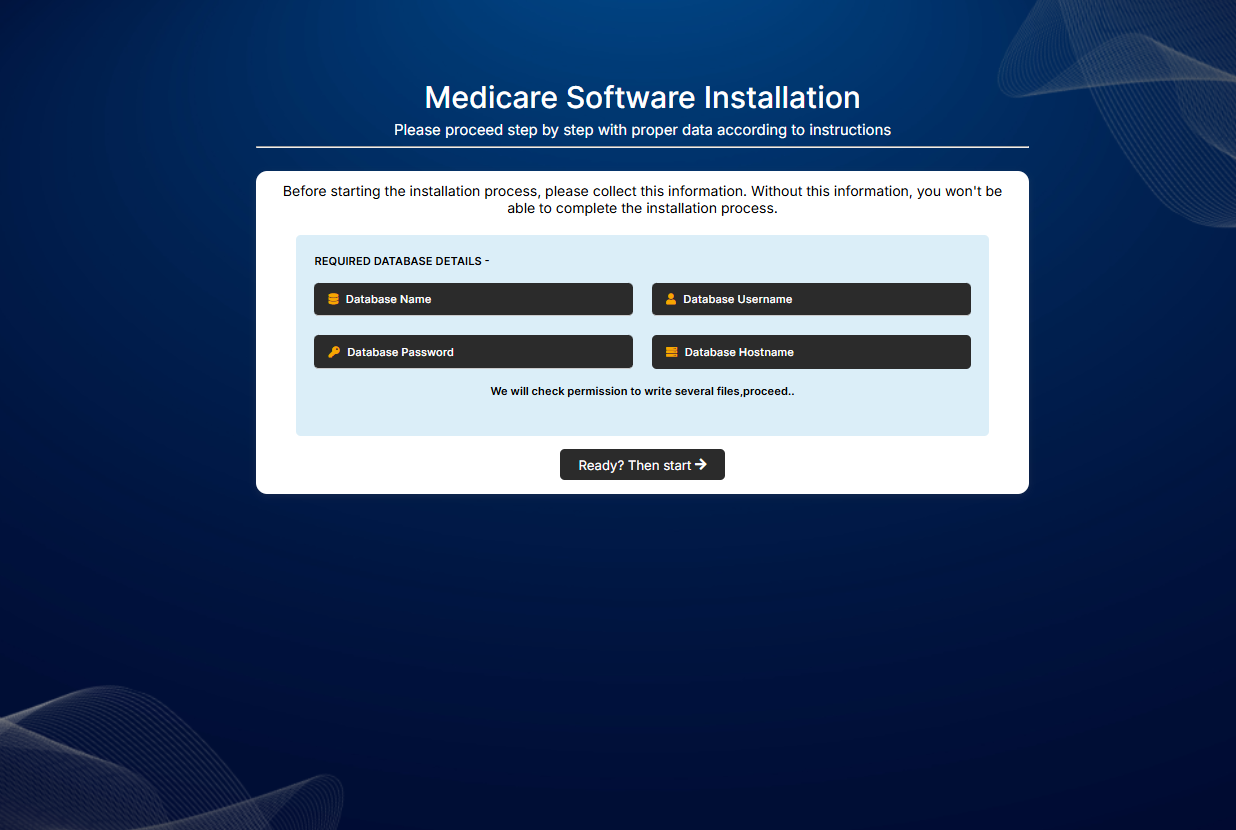
- Once successfully uploaded the medicareapi file to the server, then hit your site URL, and it will automatically take you to the installation. Click Ready to start.
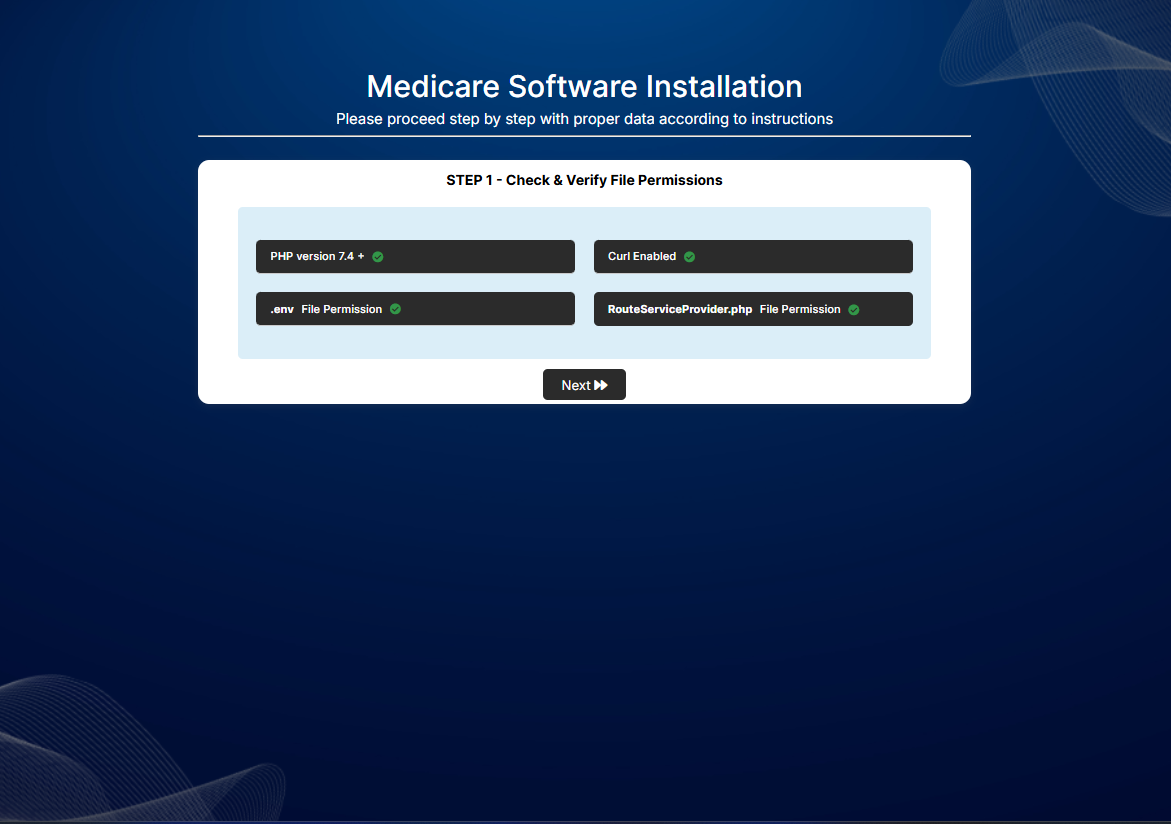
- Step 1: All the required extensions and permissions must be enabled. Check the required information if everything is OK, then click on Process Next.
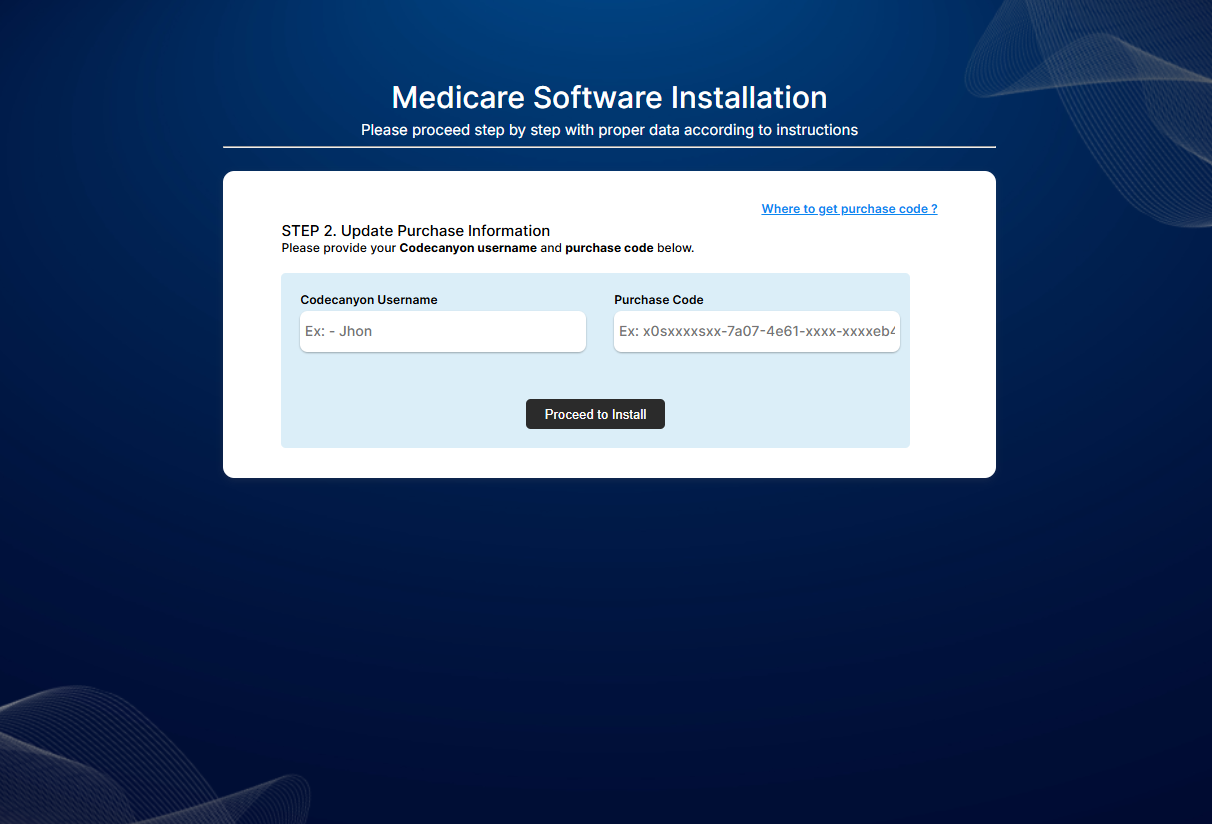
- Step 2: Provide your CodeCanyon username and purchase code and Continue.
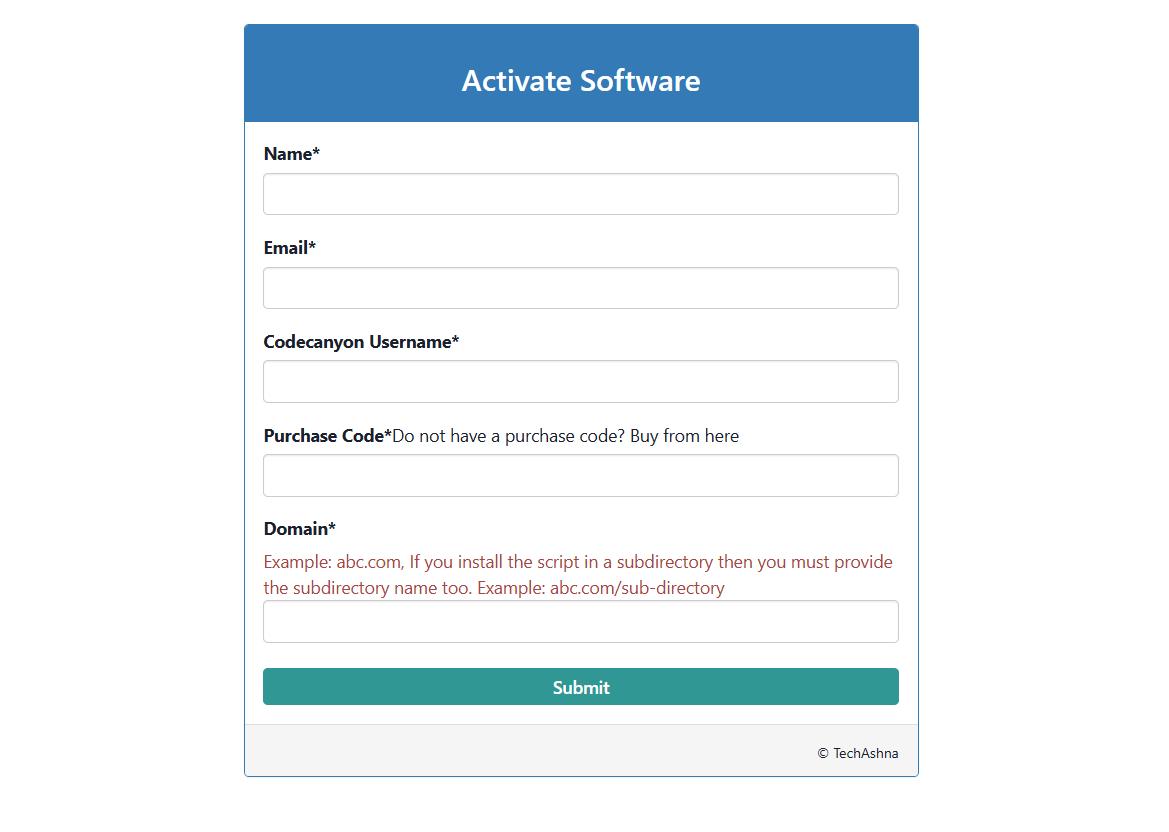
- If you find the following page, you must activate your domain. Now fill up the information and proceed.
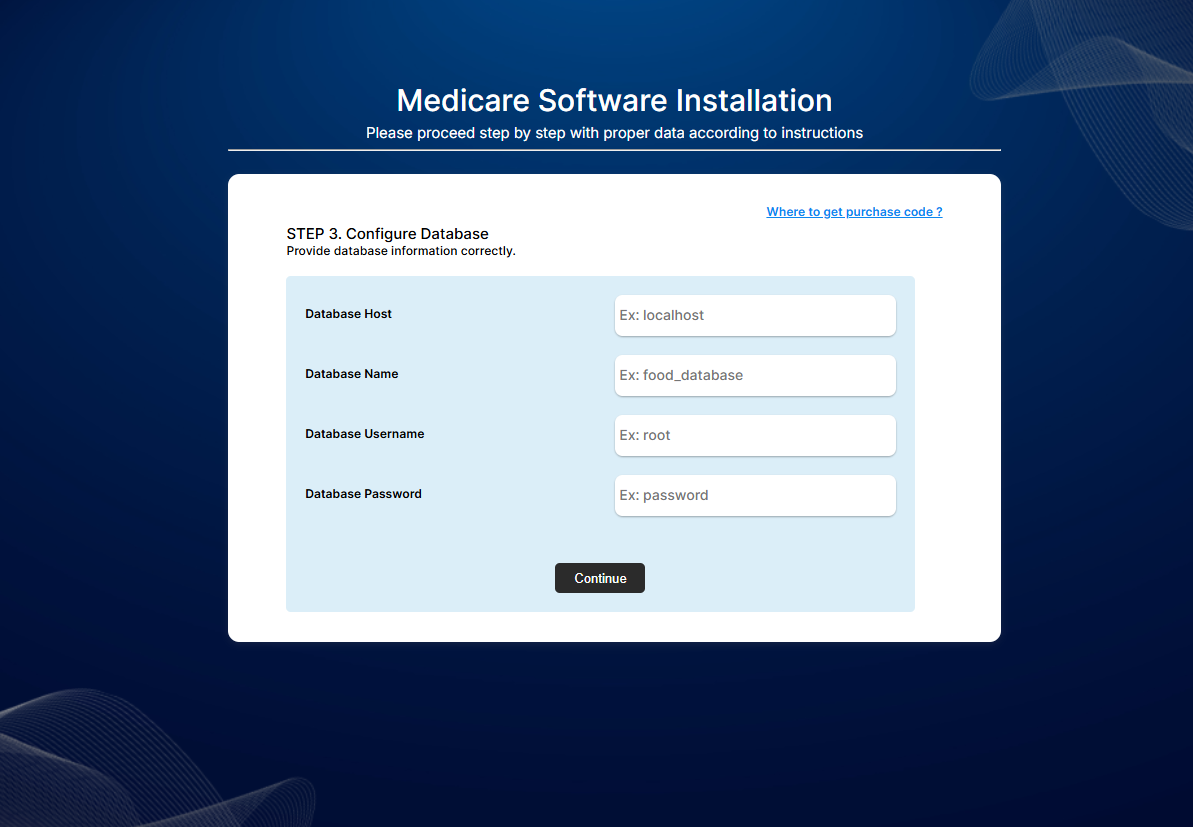
- Step 3: Now you need to set the Database host, Database name, Database username & password and click Continue. If the database is in your server, then the host is localhost.
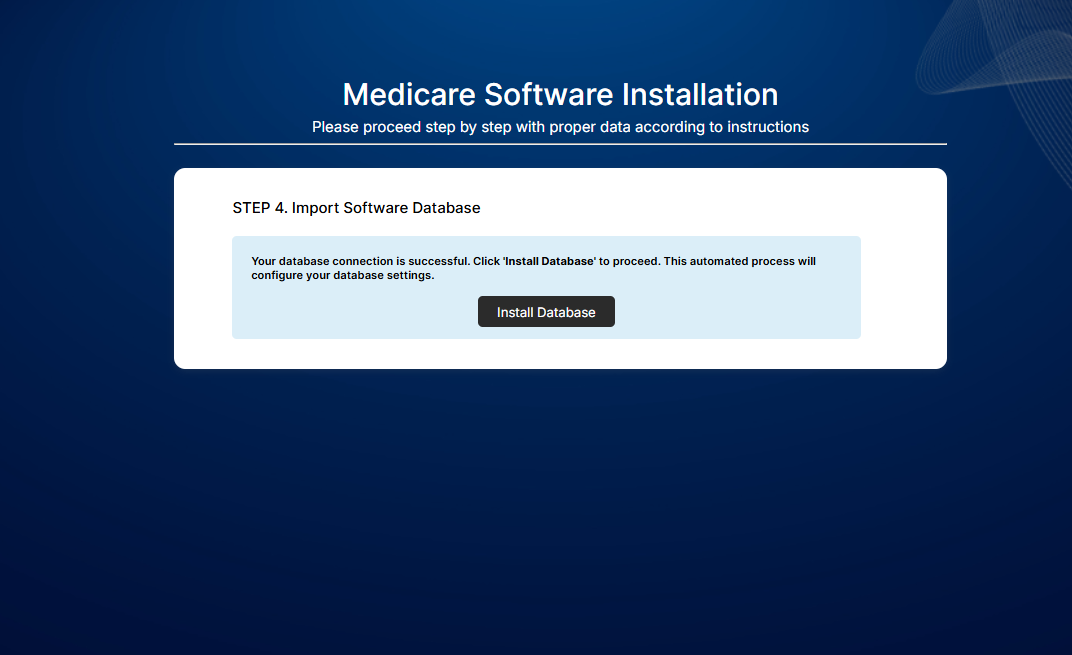
- Step 4: Now, you need to import the SQL file. For this, just press Click Here to import the database.
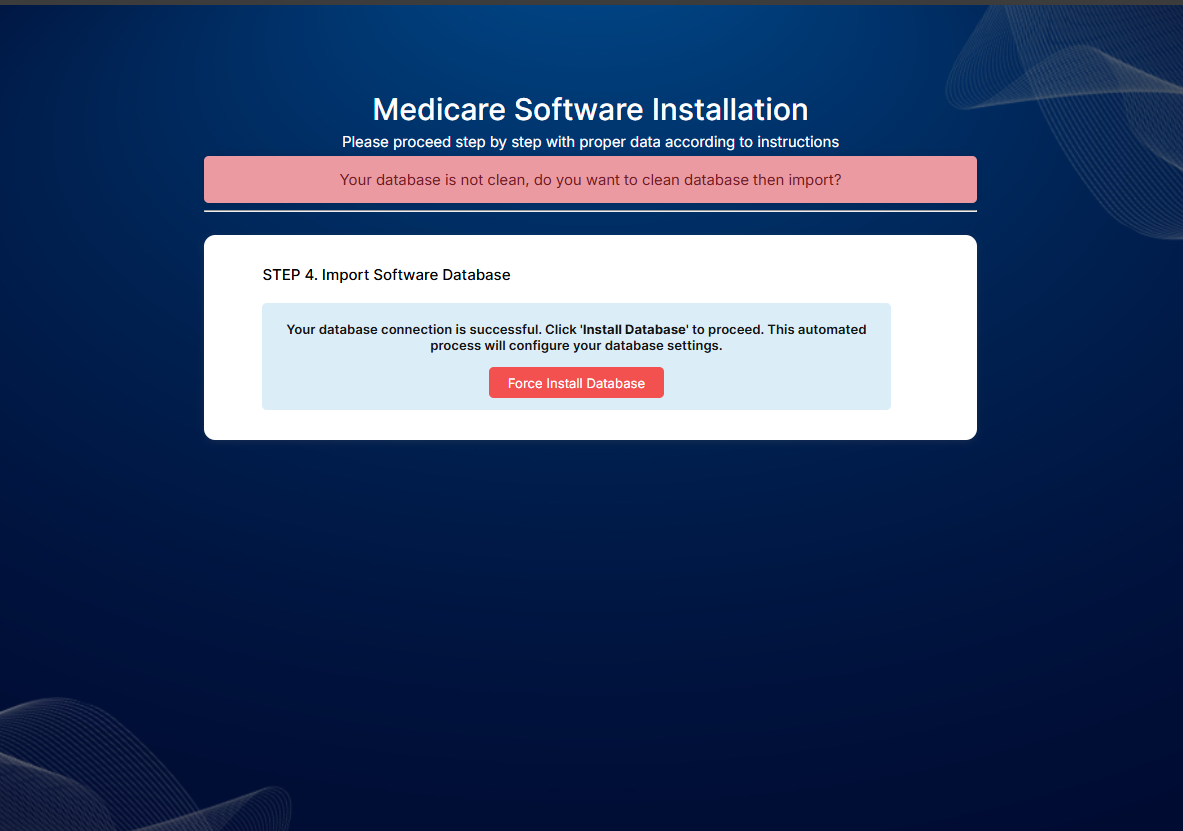
- If you find the following page, that means your database is not clean. Click ‘Force Import Database’ to import the database, which will clear your database first, then import the application’s database.
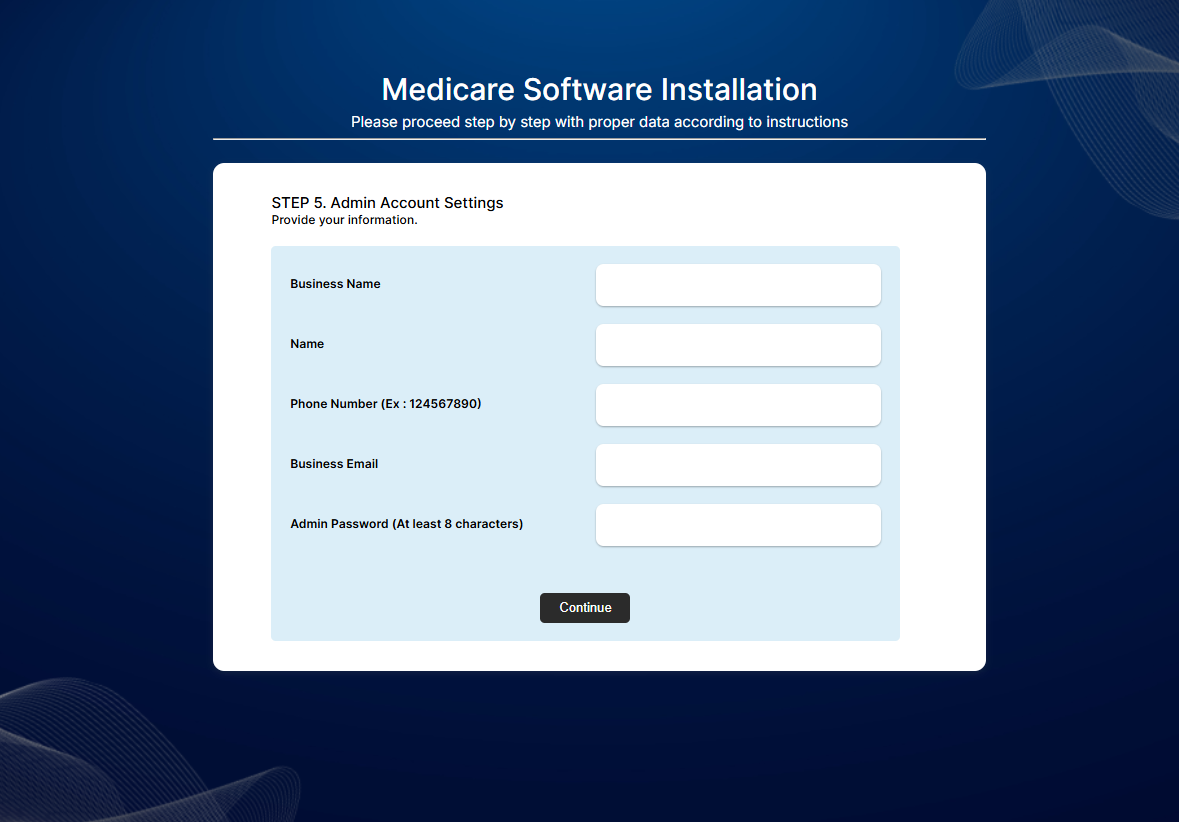
- Step 5: Now fill up the information and click Continue
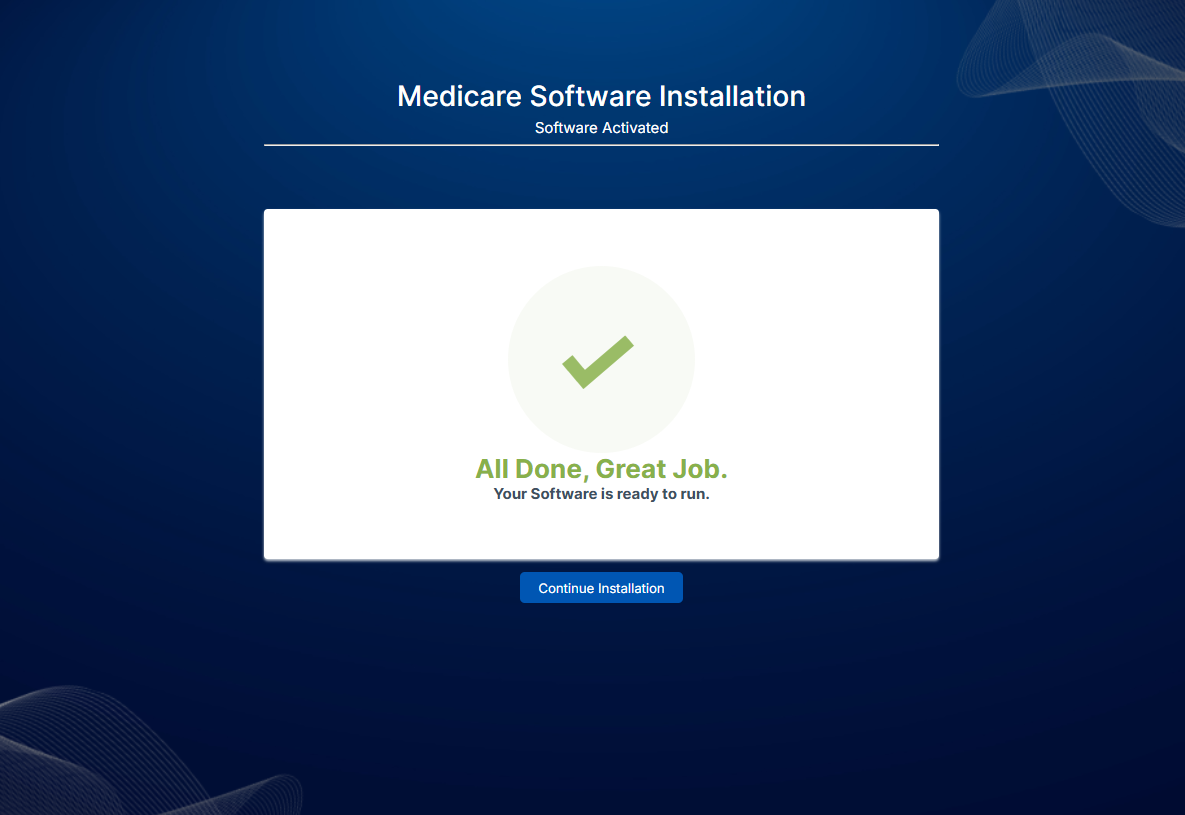
- Congratulations! Your software is ready to run. Now continue the admin panel setup.
SMTP Configuration
You can also skip this section and do it later.
- Go to your hosting panel and add new email.
- Open .env file from the domain API folder that we installed in the server.
- Now fill hosting SMTP details in the variables MAIL_HOST, MAIL_USERNAME, MAIL_PASSWORD, MAIL_FROM_ADDRESS
MAIL_MAILER=smtp
MAIL_HOST=
MAIL_PORT=587
MAIL_USERNAME=
MAIL_PASSWORD=
MAIL_ENCRYPTION=ssl
MAIL_FROM_ADDRESS=
MAIL_FROM_NAME="${APP_NAME}"
Prerequisites
Before setting up the project, ensure you meet the following requirements:
-
Node.js: Install Node.js LTS version. Check
version:
node -v -
npm or Yarn: Install npm (comes with Node.js)
or Yarn:
npm -v -
Git: Verify Git is installed:
git --version
2. Tools
- Code editor: Visual Studio Code
- Basic understanding of React.js
Environment Setup for Admin Panel
Windows
1. Install Visual Studio Code
- Download Visual Studio Code: Download VS Code.
- Run the downloaded installer and follow the instructions in the installation wizard.
2. Install Node.js
- Visit the official Node.js download page: Download Node.js.
- Download the LTS version for Windows.
- Run the installer and follow the installation steps. Ensure the npm package manager is included.
3. Extract the Project File
- You will receive a ZIP file containing the project. Extract it to a folder on your system.
- The main project folder is named admin-panel.
4. Install Project Dependencies
- Open the extracted admin-panel folder in Visual Studio Code.
-
Open the integrated terminal in VS Code (
Ctrl + `). -
Run the following command to install the dependencies:
npm install
5. Start the Development Server
-
In the terminal, run the following command:
npm run dev - The development server will start, and you can access the admin panel at: http://localhost:5173.
Linux
1. Install Visual Studio Code
- Download Visual Studio Code: Download VS Code.
- Install it using your package manager or the installer provided for Linux.
2. Install Node.js
- Download Node.js for Linux: Download Node.js.
- Use your package manager or install it manually. Ensure npm is installed.
3. Extract the Project File
- Extract the ZIP file containing the project to a folder of your choice.
- Navigate to the extracted admin-panel folder in a terminal.
4. Install Project Dependencies
-
Run the following command to install the dependencies:
npm install
5. Start the Development Server
-
Run the following command:
npm run dev - Access the admin panel at: http://localhost:5173.
Mac
1. Install Visual Studio Code
- Download Visual Studio Code: Download VS Code.
- Drag and drop VS Code to your Applications folder.
2. Install Node.js
- Visit the Node.js official website: Download Node.js.
- Download the LTS version for macOS and follow the installation steps.
3. Extract the Project File
- Unzip the project file and place the extracted admin-panel folder in a convenient location.
4. Install Project Dependencies
- Open the admin-panel folder in Visual Studio Code.
-
Open the terminal in VS Code (
Cmd + `) and run:npm install
5. Start the Development Server
-
Run the following command in the terminal:
npm run dev - Open your browser and visit: http://localhost:5173.
Tip
Recommended tutorial is below 👇
Firebase Console Setup
This guide walks you through the steps to configure a Firebase project for OTP-based authentication and notifications using the Firebase Console.
- Create a Firebase Project
- Go to the Firebase Console.
- Click on Add Project.
- Enter your project name, agree to the terms, and click Continue.
- If prompted, choose whether to enable Google Analytics (optional).
- Click Create Project.
- Enable Authentication
- In the Firebase Console, go to the Authentication section.
- Click Get Started (if you haven’t already).
- Go to the Sign-in Method tab.
-
Enable the Phone provider:
- Click the pencil icon next to Phone.
- Enable the toggle and click Save.
- Configure Recaptcha for OTP Authentication
- In the Authentication section, go to the Sign-in Method tab.
- Under Phone, scroll to the reCAPTCHA Configuration.
-
Add the domain(s) where your application will be hosted (e.g.,
localhostfor development). - Click Save.
- Enable Cloud Messaging for Notifications
- In the Firebase Console, go to Project Settings.
- Click on the Cloud Messaging tab.
- Ensure the Firebase Cloud Messaging (FCM) API is enabled.
- Copy the Server Key and Sender ID for use in your application.
- Add Your App to Firebase
- Go to the Project Overview section in the Firebase Console.
- Click the Add App button and select Web.
- Register your app by providing a name and click Register App.
- Copy the configuration code for use in your project.
- Click Continue to Console.
Mandatory Setup
- Run an existing React project on IDE
- Change the Logo and favicon
-
Go to
<project>/publicand replace logo.png with your own logo. -
Go to
<project>/publicand replace favicon.png with your own logo. - Change The Title
-
Go to
<project>/index.htmland change the value of title tag - Change Base API URL
-
Go to
<project>/.envand set the value of VITE_API_ADDRESS - Change the firebase credentials
-
Go to
<project>/.envand set the value of firebase credentials -
Go to
<project>/public/firebase.sw.jsand set the value of firebase config - Run The Project
- Open the terminal and run command
- The development server will start, and you can access the admin panel at: http://localhost:5173.
To begin, it’s essential to verify that your React and Integrated Development Environment (IDE) setup has been configured accurately
To change App logo and App Icon you need to follow these steps :
Logo :
Favicon :
Note
Please use the exact file name as described; otherwise, it will not work
<title>YOUR_APP_NAME</title>
VITE_API_ADDRESS = ‘YOUR_API_ADDRESS’;
Before you proceed, ensure you have created a Firebase web project and enabled push notifications.
                      VITE_FIREBASE_API_KEY="YOUR_FIREBASE_API_KEY"
                      VITE_FIREBASE_AUTH_DOMAIN="YOUR_FIREBASE_AUTH_DOMAIN"
                      VITE_FIREBASE_PROJECT_ID="YOUR_FIREBASE_PROJECT_ID"
                      VITE_FIREBASE_STORAGE_BUCKET="YOUR_FIREBASE_STORAGE_BUCKET"
                      VITE_FIREBASE_MESSAGING_SENDER_ID="YOUR_FIREBASE_MESSAGING_SENDER_ID"
                      VITE_FIREBASE_APP_ID="YOUR_FIREBASE_APP_ID"
                      VITE_FIREBASE_MEASUREMENT_ID="YOUR_FIREBASE_MEASUREMENT_ID"
                      VITE_FIREBASE_FCM_PUBLIC_KEY="YOUR_FIREBASE_FCM_PUBLIC_KEY"
                      const firebaseConfig = {

                      apiKey: "your_firebase_api_key",

                      authDomain: "your_firebase_auth_domain",

                      projectId: "your_firebase_project_id",

                      storageBucket: "your_firebase_storage_bucket",

                      messagingSenderId: "your_firebase_messaging_sender_id",


                      appId: "your_firebase_app_id",

                      measurementId: "your_firebase_measurement_id",

                      };
Now Your React admin panel ready to run
npm run dev
Tip
Recommended tutorial is below 👇
Customization Setup
- Change App color
-
Go to
<project>/theme.jsand replace the main color varients according to your color pallet and play with thw button varients - Change App Font
To change the app color, follow the steps below-
To change website font you have to go to
<project>/theme.js.then line 28 , inside font
object you have 3 options body , heading and mono. Replace the
fonts with your preferred fonts.
Example :-
                    body: "your font family, sans-serif",

                    heading: "your font family, sans-serif",

                    mono: "your font family, monospace",
Note
This app is built using the Chakra UI library, which provides a robust set of accessible and customizable components. If you want to explore more customization options and take full advantage of Chakra UI's features, we encourage you to check out the official Chakra UI documentation.
The documentation offers detailed guides on theming, component customization, and advanced usage, allowing you to tailor the UI to your exact needs.
Build for Production & Deploy on Server (apache)
1. Build the React Vite App for Production
Follow these steps to create a production build of your React Vite app:
- Open your project directory in a terminal.
- Run the following command to create a production build:
npm run build
2. Configure the Vite Build for Apache
To ensure proper routing on an Apache server, include a
.htaccess file in your public directory
before building the app.
Sample .htaccess File:
                  <IfModule mod_rewrite.c>

                    RewriteEngine On

                    RewriteBase /


                    # Redirect all requests to index.html

                    RewriteRule ^index\.html$ - [L]

                    RewriteCond %{REQUEST_FILENAME} !-f

                    RewriteCond %{REQUEST_FILENAME} !-d

                    RewriteRule . /index.html [L]

                  </IfModule>
After adding this file, rebuild the app using
npm run build if required.
3. Upload Files to Apache Server
-
Log in to cPanel or Hosting Account:
Access your hosting provider (e.g., Hostinger or cPanel).
-
Navigate to the File Manager:
Go to the "File Manager" in your hosting dashboard.
-
Upload Files:
Upload the contents of the
distfolder (not the folder itself) into the desired directory, such aspublic_html. -
Verify File Structure:
Ensure your structure looks similar to:
public_html/

                      ├── index.html

                      ├── assets/

                      ├── other build files...
If your app is deployed to a subdirectory (e.g.,
https://yourdomain.com/admin), follow these
steps:
React Code
Use the basename prop in the
<BrowserRouter> component in
main.jsx file:
                      <BrowserRouter basename="/admin">


                      </BrowserRouter>
Vite Configuration
Update the vite.config.js file to set the
base option:
                  import { defineConfig } from "vite";

                  import react from "@vitejs/plugin-react";


                  export default defineConfig({

                    base: "/admin",

                    plugins: [react()],

                  });
5. Test the Deployment
-
Visit your website URL (e.g.,
https://yourdomain.com). - Verify the app loads correctly, including navigation.
6. Troubleshooting
-
404 Errors on Refresh:
Ensure the
.htaccessfile is correctly placed in the root directory of your app deployment (public_html/). -
File Not Found Errors:
Confirm that all files from the
distfolder are uploaded properly, and theassets/folder is intact.
This guide should help you successfully deploy your React Vite app on an Apache server. For additional support, consult your hosting provider's support team.
Tip
Recommended tutorial is below 👇
Deployment Note
You can deploy your app anywhere you choose, whether it's on cloud platforms like AWS, VPS providers, or traditional Linux servers. The flexibility of modern web technologies ensures that your app is portable and can be hosted in various environments without issues.
For detailed instructions on how to build and deploy your app for production, we highly recommend reading the official Vite documentation. It provides comprehensive guidelines on configuring your app, optimizing for production, and deploying it to various hosting providers.
Environment Setup for Web App
Windows
1. Install Visual Studio Code
- Download Visual Studio Code: Download VS Code.
- Run the downloaded installer and follow the instructions in the installation wizard.
2. Install Node.js
- Visit the official Node.js download page: Download Node.js.
- Download the LTS version for Windows.
- Run the installer and follow the installation steps. Ensure the npm package manager is included.
3. Extract the Project File
- You will receive a ZIP file containing the project. Extract it to a folder on your system.
- The main project folder is named web-app.
4. Install Project Dependencies
- Open the extracted web-app folder in Visual Studio Code.
-
Open the integrated terminal in VS Code (
Ctrl + `). -
Run the following command to install the dependencies:
npm install
5. Start the Development Server
-
In the terminal, run the following command:
npm run dev - The development server will start, and you can access the admin panel at: http://localhost:5173.
Linux
1. Install Visual Studio Code
- Download Visual Studio Code: Download VS Code.
- Install it using your package manager or the installer provided for Linux.
2. Install Node.js
- Download Node.js for Linux: Download Node.js.
- Use your package manager or install it manually. Ensure npm is installed.
3. Extract the Project File
- Extract the ZIP file containing the project to a folder of your choice.
- Navigate to the extracted web-app folder in a terminal.
4. Install Project Dependencies
-
Run the following command to install the dependencies:
npm install
5. Start the Development Server
-
Run the following command:
npm run dev - Access the admin panel at: http://localhost:5173.
Mac
1. Install Visual Studio Code
- Download Visual Studio Code: Download VS Code.
- Drag and drop VS Code to your Applications folder.
2. Install Node.js
- Visit the Node.js official website: Download Node.js.
- Download the LTS version for macOS and follow the installation steps.
3. Extract the Project File
- Unzip the project file and place the extracted web-app folder in a convenient location.
4. Install Project Dependencies
- Open the web-app folder in Visual Studio Code.
-
Open the terminal in VS Code (
Cmd + `) and run:npm install
5. Start the Development Server
-
Run the following command in the terminal:
npm run dev - Open your browser and visit: http://localhost:5173.
Tip
Recommended tutorial is below 👇
Prerequisites
The installation and customization steps for the User App and Doctor App the same. In this guide, we provide detailed instructions for installing and customizing the User App. You can follow the same steps to install and customize the Doctor App.
-
IDE (Android Studio or Vs code)
- Windows
- Linux
- Mac
-
Flutter SDK setup (version: 3.27.1)
- Windows
- Linux
- Mac
- JDK with path setup (only for vs code)
- Xcode ( Version: 16.1 ) for IPA file build
Environment Setup
- Windows
- Linux
- Mac
- Windows
- Download Android Studio
- Visit the official Android Studio download page and download (Android Studio Koala | 2024.1.2 comes with JDK 17 pre-installed.) for Windows.
- Ensure that you are using JDK 17 for your Android projects for optimal compatibility and performance.
- Run the Installer
- Run the downloaded installer executable (e.g., android-studio-ide-'version'-windows.exe).
- Follow Installation Wizard
- Follow the instructions in the installation wizard.
- Choose a custom installation location if needed.
- Select the components you want to install (Android Studio, Android Virtual Device, etc.).
- Start Android Studio
- Once the installation is complete, launch Android Studio.
- Install SDK Components
- Android Studio will prompt you to install additional SDK components and tools. Allow it to download and install them.
- Set up Emulator (Optional)
- If you plan to use an emulator, you can create one through the AVD (Android Virtual Device) Manager in Android Studio.
- Download Flutter SDK.
- Visit the official Flutter download page for for Windows.
- Extract Flutter Archive.
- Extract the downloaded Flutter zip file to a location on your machine. For example, ‘C:\flutter’.
- Add Flutter to System Path
-
Add the
flutter\bindirectory to your system’s PATH variable. - Right-click on “This PC” or “Computer” on your desktop or in File Explorer.
- Select “Properties” -> “Advanced system settings” -> “Environment Variables.”
- In the “System variables” section, find and select the “Path” variable, then click “Edit.”
-
Click “New” and add the path to the
bindirectory inside the Flutter directory. - Verify Flutter Installation
- Open a new Command Prompt and run ‘flutter doctor’ to check for any dependencies that need to be installed or configured.
- Install Flutter Plugins for Android Studio
- Open Android Studio.
-
Install the Flutter and Dart plugins through
File->Settings->Plugins->Marketplace. - Restart Android Studio to apply the changes.
- Linux
- Download Android Studio:
- Visit the official Android Studio download page and download Android Studio Koala | 2024.1.2 (comes with JDK 17 pre-installed) for Windows.
- Ensure that you are using JDK 17 for your Android projects for optimal compatibility and performance.
- Extract the Archive:
- Open a terminal and navigate to the directory where the archive was downloaded.
-
Extract the archive using the following command:
tar -xvzf android-studio-ide-<version>-linux.tar.gz(replaceandroid-studio-ide-<version>-linux.tar.gzwith the actual filename). - Move to Installation Location:
-
Move the extracted folder to a location of your choice. For
example:
sudo mv android-studio /YOUR_DIRECTORY. - Run Android Studio Setup:
-
Navigate to the bin directory inside the Android Studio
folder:
cd /YOUR_DIRECTORY/android-studio/bin. -
Run
./studio.shto start the Android Studio setup. - Follow Installation Wizard:
- Follow the instructions in the setup wizard to complete the installation.
- Choose a custom installation location if needed.
- Download Flutter SDK:
- Visit the official Flutter download page and download the latest stable version for Linux.
- Extract Flutter Archive:
- Open a terminal and navigate to the directory where the archive was downloaded.
-
Extract the archive using the following command:
tar xf flutter_linux_<version>.tar.xz(replaceflutter_linux_<version>.tar.xzwith the actual filename). - Move to Installation Location:
-
Move the extracted folder to a location of your choice. For
example:
sudo mv flutter /YOUR_DIRECTORY. - Add Flutter to System Path:
-
Add the
flutter/bindirectory to your system’s PATH variable. - Verify Flutter Installation:
-
Open a new terminal and run:
flutter doctor. - Install Flutter Plugins for Android Studio:
- Open Android Studio.
-
Install the Flutter and Dart plugins through
File->Settings->Plugins->Marketplace. - Restart Android Studio to apply the changes.
- Mac
- Download Android Studio:
- Visit the official Android Studio download page and download Android Studio Koala | 2024.1.2 (comes with JDK 17 pre-installed) for Windows.
- Ensure that you are using JDK 17 for your Android projects for optimal compatibility and performance.
- Open the DMG file:
- Open the downloaded DMG file.
- Drag and drop Android Studio into the “Applications” folder.
- Run Android Studio:
- Open the “Applications” folder and launch Android Studio.
- Set up Android Studio:
- Complete the Android Studio Setup Wizard.
- Android Studio may prompt you to install additional components and SDKs. Follow the instructions to install them.
- Download Flutter SDK:
- Visit the official Flutter download page and download the latest stable version for macOS.
- Extract Flutter Archive:
- Open a terminal and navigate to the directory where the archive was downloaded.
-
Extract the archive using the following command:
tar xf flutter_macos_<version>.tar.xz(replaceflutter_macos_<version>.tar.xzwith the actual filename). - Move to Installation Location:
-
Move the extracted folder to a location of your choice. For
example:
sudo mv flutter /YOUR_DIRECTORY. - Add Flutter to System Path:
-
Add the
flutter/bindirectory to your system’s PATH variable. - Verify Flutter Installation:
-
Open a new terminal and run:
flutter doctor. - Install Flutter Plugins for Android Studio:
- Open Android Studio.
-
Install the Flutter and Dart plugins through
Preferences->Plugins->Marketplace. - Restart Android Studio:
- Restart Android Studio to apply the changes.
Install Android Studio
Install Flutter SDK
Install Android Studio
Install Flutter SDK:
Install Android Studio
Install Flutter SDK
Mandatory Setups
- Run an existing flutter project on IDE
-
Execute the command
flutter doctorin your terminal. If any issues arise during this process, make sure to address and resolve them promptly. -
Then open your project. Once the project is open, Android
Studio may prompt you to install the dependencies. If not, you
can run the
flutter pub getfrom the terminal in the project directory to fetch the dependencies. - After the dependencies are installed, you should be able to run the app.
- Change App Logo and Icon
-
Go to
<project>/assets/icons/and replace logo.png with your own logo. -
Then go to
/android/app/src/main/resand replace all mipmap folders with your <generated icon>/android folder. -
Again go to
/ios/Runnerand replace Assets.xcassets with your generated Assets.xcassets folder. - Change App Name
-
Go to
<project>/lib/utilities/app_constans.dartand set the value of appName -
Change the value of label from
<project>/android/app/src/main/AndroidManifest.xml -
Change the value of CFBundleName from
<project>/iOS/Runner/info.plist/iOS/Runner/info.plist - Change Base URL
-
Go to
<project>/lib/utilities/api_content.dartand set the value of webApiUrl - Change App Package
- Setup Firebase, Phone Authentication And Push Notification
- Add an Android app under your Firebase project with your own package name and app name.
-
Click the Register App button and download
the
google-services.jsonfile from there. -
Copy the downloaded
google-services.jsonfile and navigate to:<project>/android/app/delete the existinggoogle-services.jsonfile, and paste the new file you downloaded. -
Create a totally white PNG logo for the notification icon.
Paste it on
<project>/android/app/src/main/res/drawable/and replace notification_icon.png with your whiter version logo. Must keep the icon name notification_icon.png - In the Firebase Console, navigate to Authentication > Sign-in method.
- Click Phone in the list of sign-in providers.
- Toggle Enable to ON
- Click Save.
-
Again add an app under the same project and download
GoogleService-Info.plist and paste it under
<project>/iOS/ folder. Also, follow this documentation for full setup for IOS Firebase Notification: https://firebase.flutter.dev/docs/messaging/apple-integration - Go to the Firebase Console Visit Firebase Console
-
Select Project and click on
Project Settingspage then click onCloud messagingthen click onManage Service Account. -
Now make sure you are in the Service account page and your
firebase project is selected. then click
Create Service Account - Fill all the deatils and Create Service account with three roles Firebase Admin SDK Administrator Service Agent,Firebase Authentication Admin, Service Account Token Creator
- Click in three dots and go inside the Manage Key.
- Add new key and create key with json.
- Once you pressed the create button then json file will be download.
-
Open then json file and copy content and past in the admin
panel of project
Admin Panel->Settings->Firebaeedit GOOGLE_SERVICE_ACCOUNT_JSON.
To begin, it’s essential to verify that your Flutter and Integrated Development Environment (IDE) setup has been configured accurately
To change App logo and App Icon you need to follow these steps :
App Logo :
Note
Please use the exact file name as described; otherwise, it will not work
App Icon :
You can generate your app icon using this site Visit
you need to set your app name in three different places.
static const String appName = ‘YOUR_APP_NAME’;
android:label="YOUR_APP_NAME"
CFBundleName YOUR_APP_NAME First you have to install API in your server. once it's done then you have to past the api url in webApiUrl.
static const String webApiUrl = 'YOUR_API_URL';
static const webApiUrl="Api_Base_Url";
First, you have to find out the existing package name. You can
find it out from the top of the
<project>/android/app/build.gradle file. Now
right-click on the project folder from Android Studio and click
on replace in files. You will get a popup window with two input
boxes. In the first box, you have to put the existing package
name that you saw in the build.gradle file previously and write
down your preferred package name in the second box and then
click on the Replace All button.
First, you have to change your package name. Then have to create a Firebase project from https://console.firebase.google.com
Note
If you have already created a Firebase project during the installation process for the admin app and web app, there is no need to create a new project. The same Firebase project must be used for the User App and Doctor App. Remember, the admin app, web app, user app, and doctor app will all be part of one shared Firebase project.
Android Setup :
Enable Phone Authentication
IOS Setup
After your setup, please restart your IDE and uninstall your previously installed app then run it. Also, don’t try to test it on an emulator or simulator. Emulators and simulators are unable to get push. Use a real device in this case.
Create Service Account
Once the service account created then we have to create key.
Customisation
- Change App Color
-
Open the
<project>/lib/utilities/colors_constant.dartfile. Set appBarColor, primaryColor, secondaryColor, and other colors, and adjust them according to your preferences. - Change App Font
- Download your preferred font from the internet. Google has many free fonts you can check them: https://fonts.google.com/
-
Unzip fonts and paste them to
<project>/assets/font/folder. - Mentioned them in <project>/pubspec.yaml file like
-
Replace the font family name in the
<project>/lib/theme/light_theme.dart, - Change App Image
-
Copy new image and past in the
<project>/assets/icons/folder -
Now open
<project>/pubspec.yamlfile and past the image file name in the asset section, like this. - Run
flutter pub get -
Open
<project>/lib/utilities/image_constants.dartand replace the name. - Change App Version
-
open
<project>/pubspec.yamlfile and replace the version number. - Now run the
flutter pub get. -
Chnage the version also from
Admin Panel->Settings->Mobile AppEdit Android App Version. - Open project in xcode.
-
Go inside
Runner->Generalchnage the version and buid number. -
Chnage the version also from
Admin Panel->Settings->Mobile AppEdit IOS App Version.
If you want to customize app theme color then follow these steps :
We use the Poppins font. However, if you want to change the app’s font, then follow these steps:
                      fonts:


                            - family:
                      YOUR_FONT_FAMILY_NAME


        fonts:


                                -
                      assets/font/YOUR_FONT_FILE_NAME.ttf


            weight:
                      YOUR_FONT_WEIGHT
fontFamily: 'Poppins'
If you want to change the app images then follow these steps :
- assets/icons/your_image.png
                      static const String
                      telephoneImageBox="assets/icons/telephone.png";
If you want to change the app version then follow these steps :
Android
version: 1.0.0+1
IOS
Zoom Video Call Setup
We are using Zoom for seamless video consultations between doctors and patients in Medicare. To enable this functionality, you need to integrate the Zoom third-party application into the Medicare system. Completing the Zoom setup is essential for activating video call features, ensuring efficient and secure communication between healthcare providers and their patients.
Steps to Set Up Zoom in Medicare
-
Create a Zoom Account
- Sign up for a Zoom account if you don't already have one. Visit Zoom's official website to register.
-
Log in to the Zoom Marketplace
- Visit the Zoom App Marketplace and log in with your Zoom account.
-
Navigate to the App Creation Section
- Click on the Develop dropdown at the top-right corner of the page.
- Select Build App.
-
Select App Type
- Choose Server-to-Server OAuth as the app type.
- Click Create and provide a name for your app.
-
Fill in App Information
- Complete the basic app information, such as the app name, company name, and contact details.
- Save the information and proceed to the Scopes section.
-
Add Required Scopes
- Click on Add Scopes and select the following:
-
meeting:update:meeting:admin(Update a meeting) -
meeting:delete:meeting:admin(Delete a meeting) -
meeting:write:meeting:admin(Create a meeting for a user) - Save the changes after adding the scopes.
-
Review and Activate
- Review the app settings to ensure all required details and scopes are configured correctly.
- Click Activate Your App to enable it for use.
-
Obtain API Credentials
- Navigate to the App Credentials tab to access the Account ID, Client ID and Client Secret.
- Save these credentials securely as they are required to authenticate and make API calls.
-
Update Medicare Settings
- Open the admin panel and go to the Settings section.
- Navigate to Video under Settings.
- Update the Account ID, Client ID, and Client Secret obtained from Zoom in the respective fields.
- Save the changes to complete the configuration.
Assets Credentials
All the icons are free to use according to their websites, but you must place the attribution.
- For png images - Icons made by Freepik from www.flaticon.com
- For svg images - SVG made by unDraw
Updates
If you are already using the latest version of the software, no changes are required. However, if you are using an older version and want to update to the new version, you need to replace the necessary files.
Follow the below setup to update the Medicare
V1.1.0 To V1.2.0 16 February 2025
- Updated all flutter dependencies to their latest stable versions, enhancing performance and stability.
- Login button bug fix in user mobile app.
- Fixed bugs in admin panel.
- Resolved issues in the web app affecting different sections.
- Fixed bugs in the Razorpay payment controller in web app.
Steps to update
- Replace the Medicare_User_App/pubspec.yaml file from version V1.1.0 with the V1.2.0 file.
- Replace the doctorapp/pubspec.yaml file from version V1.1.0 with the V1.2.0 file.
- Replace the Medicare_User_App/lib/widget/drawer_widget file from version V1.1.0 with the V1.2.0 file.
- Replace all files in project/src/pages/setting/PaymentGateways from version V1.1.0 with the V1.2.0 file.
- Replace all files in project/src/pages/setting/Social Media from version V1.1.0 with the V1.2.0 file.
- Replace the medicare-admin-panel/src/Pages/Users/UpdateUser.jsx file from version V1.1.0 with the V1.2.0 file.
- Replace the medicare-admin-panel/src/Pages/Users/AddUser.jsx file from version V1.1.0 with the V1.2.0 file.
- Replace the medicare-admin-panel/src/Pages/Patients/Update.jsx file from version V1.1.0 with the V1.2.0 file.
- Replace the medicare-admin-panel/src/Pages/Patients/AddPatients.jsx file from version V1.1.0 with the V1.2.0 file.
- Replace the medicare-admin-panel/src/Pages/Family-Members/Edit.jsx file from version V1.1.0 with the V1.2.0 file.
- Replace the medicare-admin-panel/src/Pages/Family-Members/Add.jsx file from version V1.1.0 with the V1.2.0 file.
- Replace the medicare-admin-panel/src/Pages/Doctors/Update.jsx file from version V1.1.0 with the V1.2.0 file.
- Replace the medicare-admin-panel/src/Pages/Doctors/Add.jsx file from version V1.1.0 with the V1.2.0 file.
- Replace the medicare-web-app/src/Pages/Signup.jsx from version V1.1.0 with the V1.2.0 file.
- Replace the medicare-web-app/src/Pages/login.jsx from version V1.1.0 with the V1.2.0 file.
- Replace the medicare-web-app/src/Components/Patients.jsx from version V1.1.0 with the V1.2.0 file.
- Replace the medicare-web-app/src/Components/Testimonials.jsx from version V1.1.0 with the V1.2.0 file.
- Replace the medicare-web-app/src/Controllers/RazorpayPaymentController.jsx from version V1.1.0 with the V1.2.0 file.
V1.0.0 To V1.1.0 28 January 2025
- Migrated the application to Flutter 3.27.x, ensuring compatibility with the latest framework updates.
- Updated all dependencies to their latest stable versions, enhancing performance and stability.
Steps to update
- Replace the Medicare_User_App/pubspec.yaml file from version V1.0.0 with the V1.1.0 file.
- Replace the doctorapp/pubspec.yaml file from version V1.0.0 with the V1.1.0 file.
- Replace the medicare-admin/panel/src/pages/Setting/PaymentGetways/Update.jsx file from version V1.0.0 with the V1.1.0 file.
Support
I'd like to thank you again for your purchase and I hope you where able to successfully install the Medicare app and using it in your future business . If you need support or have some questions. You can visit our support resources. If you need any help using the file or need special customizing please feel free to contact me via my codecanyon profile also. If you have a moment, please rate this item, I’ll appreciate it very much!.... Thank you
Support resources
- Support URL - Support
- Email - appwebdevash@gmail.com
- Phone And Whatsapp - +91 8889990643
- Phone And Whatsapp - +91 9754472611